Hubby and I are finally coming down from a wonderful Thanksgiving high. It was a great week all around. Hubby took off the entire week from work. Which means that when we spend too much time together around the house it could spell trouble. In my mind he's invading my domestic space and I'm not sure sometimes how to deal with it. We survived grocery shopping together and preparing the house for guests. I was on guarded behavior that week because I didn't want to send him running out of the house to work. I finally realized that after 13 1/2 years of married life he can't read my mind and know what I expect him to do*. I let him know how I do things so an argument wouldn't ensue.
The girls only had to go to school two days of the week, which allowed me to do grocery shopping kid free**. Then they headed to Granny's house for a couple of days leading up to Thanksgiving. I had the kitchen to myself to prepare everything.
When I started thinking of what we needed to do to prepare we started going over the house with a fine tooth comb. One of the things that has been bothering us since we moved in are the toilet seats. I kid you not. They should have been replaced eight years ago when we first moved in. The toilet seat in the master bath was one of those plastic cushioned ones. Just odd. The others had just seen better days. They were actually not as expensive to replace so we did it. It's truly the little things that get us all excited, and we were actually able to do it ourselves. That's impressive, because we can't do anything around the house.
Now on to the good stuff. Preparing the food. I put the turkey breasts in the crock pot. I also made green bean bundles that were to die for! I couldn't forget the macaroni and cheese fans, so we had plenty of that. Mind you there was no powdered cheese involved***! Honey roasted sweet potatoes were also being marinated****. Don't forget the gluttony of desserts. I made my first pecan pie. I also made a chocolate chip pound cake and cherry cream cheese tarts.
Thanksgiving was filled with food, family and a little bit of fun mixed in. My cousin said it best when she said that she enjoyed Thanksgiving better than Christmas. With Thanksgiving there's no pressure on giving the perfect gift. You're spending time with family and it's just that.
Isn't the greatest gift we can give time?
Sum up Thanksgiving like this: Full tummy. Full heart. Full house. Full fridge. Does it get any better than that?
*Seriously? What's taking that man so long?
**Kid free, but Hubby was with me so it could be a tie. I kid. I kid.
***It's just as easy as the box kind, so I think that's what I'll be making from now on.
****I'm not a sweet potato fan but I thought everybody else was. Thank God my cousin brought regular mashed potatoes.
Wednesday, November 30, 2011
Thursday, November 17, 2011
Thankful Tree
I've mentioned that my cousin is responsible for my new addiction. That new addiction being Pinterest. It is a great community of creative people that post their ideas to this web site and you can post your own, or re-pin their ideas.*
 The above definition nails it. Even #3. But, I consider it more productive than facebook and I've actually made use of some of the ideas. It's where I got the ideas and knowledge to refinish my kitchen table. I made my NOEL piece. There are other ideas I can't wait to get started on. I could even get my kids involved with some of them.
There was one idea that I thought would be neat to try for the month of November. With Thanksgiving coming round the bend I thought my family could put what we are thankful for each day of the month of November. I saw where someone had posted a picture of some tree limbs in a vase and had some different colored circles tied with string hanging from it. They called it a Thankful Tree.
 Who couldn't do this, right? I thought it would be a great way to remind myself and the kids that we have A LOT to be thankful for. Even in times when we don't appreciate it. I went out to my monster of a crepe myrtle in the backyard and clipped a few limbs. I printed up a template that had different leaf shapes. I grabbed a bunch of my scrapbook paper that hasn't and probably wouldn't be used anytime soon and started cutting leaf shapes.
I started it the first of November and we write on a different leaf each day.**
I even started one in our 5th grade Sunday school class. ***For the Sunday school kids we give them a leaf each Sunday and they are to write down something they're thankful for. This picture is from before I hung up the leaves. Another teacher took pictures of the kids and she wants to hang those from the tree as well.
 When I was working on building the tree at church someone showed me all of the diecuts they have. They have a great leaf shape that was perfect. I had to go back a second day to work on the tree at church and I took more of my scrapbook paper and made more leaves for my home tree. That was so much easier than using scissors!
I'm going to hate to have to take that tree down!
This is how the Thankful Tree is going at my home:
 The leaves just cover the little excuse of a limb. Maybe next year I will just make circles for us to write our notes on.
This is definitely something I would like to make a family tradition!
*I've noticed that the most creative people I'm following are LDS. Is creativity a requirement of their faith? It must be a spiritual gift for them.
**The kids have been much more faithful in this than I have because some days I have been in an emotional pit. We took our house off of the market and it just sort of feels like a dream is dying.
***Yep. Hubby and I are teaching in a 5th grade class. Pray for those children!! =)
There was one idea that I thought would be neat to try for the month of November. With Thanksgiving coming round the bend I thought my family could put what we are thankful for each day of the month of November. I saw where someone had posted a picture of some tree limbs in a vase and had some different colored circles tied with string hanging from it. They called it a Thankful Tree.

I started it the first of November and we write on a different leaf each day.**
I even started one in our 5th grade Sunday school class. ***For the Sunday school kids we give them a leaf each Sunday and they are to write down something they're thankful for. This picture is from before I hung up the leaves. Another teacher took pictures of the kids and she wants to hang those from the tree as well.

I'm going to hate to have to take that tree down!
This is how the Thankful Tree is going at my home:

This is definitely something I would like to make a family tradition!
*I've noticed that the most creative people I'm following are LDS. Is creativity a requirement of their faith? It must be a spiritual gift for them.
**The kids have been much more faithful in this than I have because some days I have been in an emotional pit. We took our house off of the market and it just sort of feels like a dream is dying.
***Yep. Hubby and I are teaching in a 5th grade class. Pray for those children!! =)
DIY NOEL
I have Pottery Barn taste without the PB budget! Pottery Barn rocks the cozy, classy, comfortable style that I love. From furniture to chandeliers and wall art to the needless knick knacks.* The holiday season is definitely no different. There's been one item that they've featured in holiday catalogs the past couple of years.

NOEL. Something fun for the fireplace mantle for the Christmas season. Made of iron with a hand pounded bronze finish. With a PB price tag to boot!**
I'm all for a hand pounded bronze finished piece of metal like the next lady, but seriously? Let me have a hammer, soda cans and some paint and I got this one.
When it comes to some things decor around our house, if I want it bad enough I have to use my play money. It usually has to be something totally wonderful for me to spend it on stuff other than what it's really meant for.***
I started googling images of the wall art. I came across some crafting blogs that have their own versions of the NOEL piece. One was so close to the PB version that I had to read up on it.
I went to my favorite craft store and found wooden letters. The size of the letters isn't quite as big as the PB version, but it's close enough.
 So. Let me think about this for just a moment. The PB version is $149. I went to my favorite craft store and spent about $8. Then I went to the local hardware store to get paint. That was around $10 because I couldn't choose between two different colors, so of course I bought both!
Once I chose the color I wanted to go with I spray painted both sides.**** Then I used craft sticks (popsicle sticks) to hold the entire piece together on the back side.
 I let the glue set overnight. And voila!
 I used a metallic spray paint for a look similar to the PB version. It's sort of hard to tell in this picture.

Now I can chalk up under my DIY belt:
-2011 girls Halloween costumes. They wanted to be the Statue of Liberty. I made the torches out of yellow, orange and red tissue paper and craft foam. I also made their crowns.
-refinished our kitchen table
-NOEL wall art
There's a certain amount of pride that goes along with completing projects. And for just about the same results as spending too much money at the store of my inspirations. I won't hold it against the store! How could I?
*makes you think of the song that includes knick knack paddywhack doesn't it?
**$149
***haircuts, pedicures, clothes etc can add up
****Yes. Both sides. Because I know people who would turn it over and look. Then they would say, "You didn't paint the back side?" Isn't a properly finished piece of art better, anyway?

NOEL. Something fun for the fireplace mantle for the Christmas season. Made of iron with a hand pounded bronze finish. With a PB price tag to boot!**
I'm all for a hand pounded bronze finished piece of metal like the next lady, but seriously? Let me have a hammer, soda cans and some paint and I got this one.
When it comes to some things decor around our house, if I want it bad enough I have to use my play money. It usually has to be something totally wonderful for me to spend it on stuff other than what it's really meant for.***
I started googling images of the wall art. I came across some crafting blogs that have their own versions of the NOEL piece. One was so close to the PB version that I had to read up on it.
I went to my favorite craft store and found wooden letters. The size of the letters isn't quite as big as the PB version, but it's close enough.

Once I chose the color I wanted to go with I spray painted both sides.**** Then I used craft sticks (popsicle sticks) to hold the entire piece together on the back side.


Now I can chalk up under my DIY belt:
-2011 girls Halloween costumes. They wanted to be the Statue of Liberty. I made the torches out of yellow, orange and red tissue paper and craft foam. I also made their crowns.
-refinished our kitchen table
-NOEL wall art
There's a certain amount of pride that goes along with completing projects. And for just about the same results as spending too much money at the store of my inspirations. I won't hold it against the store! How could I?
*makes you think of the song that includes knick knack paddywhack doesn't it?
**$149
***haircuts, pedicures, clothes etc can add up
****Yes. Both sides. Because I know people who would turn it over and look. Then they would say, "You didn't paint the back side?" Isn't a properly finished piece of art better, anyway?
Wednesday, November 16, 2011
A Day In The Life
Has there ever been someone you wish you could walk in their shoes for one day? Just pop in and experience what it would be like for a few hours and then go right back to the one you have. I have to admit there is someone I wish I could trade places with*.
Maybe it would be better asked if you would like to be a fly on the wall.
One of my new favorite shows on television is Selling New York. It features real estate agents from Core, Warburg and Gumley Haft Kleier. It details the riggers of the wheeling and dealing of New York real estate. These are people I would love to have on my side anytime when dealing with real estate.
One of my favorite properties that they've featured on the show this season is the Clock Tower in Dumbo. It's an area of Brooklyn that used to be a cardboard factory. The penthouse.
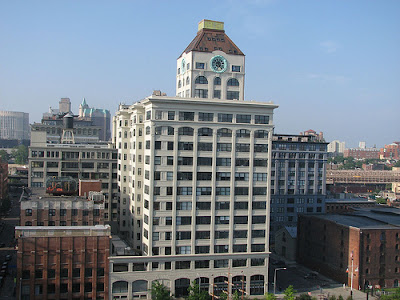 Gumley Haft Kleier got the listing and offered it at a cool $23 million**. Wowza! It's definitely been one of the more expensive properties featured on the show.
The apartment was gorgeous. A little (or a lot) on the contemporary side, but still beautiful. It had a very lofty, open feel to the space. Limitless views of New York City.
 The agents held a party in the evening to show off the views from this apartment. It was fantastic! It was as if you were above the clouds looking at a sky full of millions of stars.
There's just never a dull moment on this show. It's a different world in New York real estate, that's for sure!
Yes. I wouldn't mind just one day in Sabrina Kleier Morgenstern's gorgeous Louboutins***. Until then, I'll keep watching the show. There will come a time when I'll make it to New York. But, I'll be wearing my sensible athletic shoes and most likely looking like the most giddy tourist there ever was!
*Only for a few hours to see the things that they get to see on a daily basis. I wouldn't trade (on a permanent basis) my life with anyone.
**It ended up selling several months later for just over $7 million.
***With a lengthy foot massage afterward.
Maybe it would be better asked if you would like to be a fly on the wall.
One of my new favorite shows on television is Selling New York. It features real estate agents from Core, Warburg and Gumley Haft Kleier. It details the riggers of the wheeling and dealing of New York real estate. These are people I would love to have on my side anytime when dealing with real estate.
One of my favorite properties that they've featured on the show this season is the Clock Tower in Dumbo. It's an area of Brooklyn that used to be a cardboard factory. The penthouse.

The apartment was gorgeous. A little (or a lot) on the contemporary side, but still beautiful. It had a very lofty, open feel to the space. Limitless views of New York City.

There's just never a dull moment on this show. It's a different world in New York real estate, that's for sure!
Yes. I wouldn't mind just one day in Sabrina Kleier Morgenstern's gorgeous Louboutins***. Until then, I'll keep watching the show. There will come a time when I'll make it to New York. But, I'll be wearing my sensible athletic shoes and most likely looking like the most giddy tourist there ever was!
*Only for a few hours to see the things that they get to see on a daily basis. I wouldn't trade (on a permanent basis) my life with anyone.
**It ended up selling several months later for just over $7 million.
***With a lengthy foot massage afterward.
Wednesday, November 2, 2011
I Finally Did It!
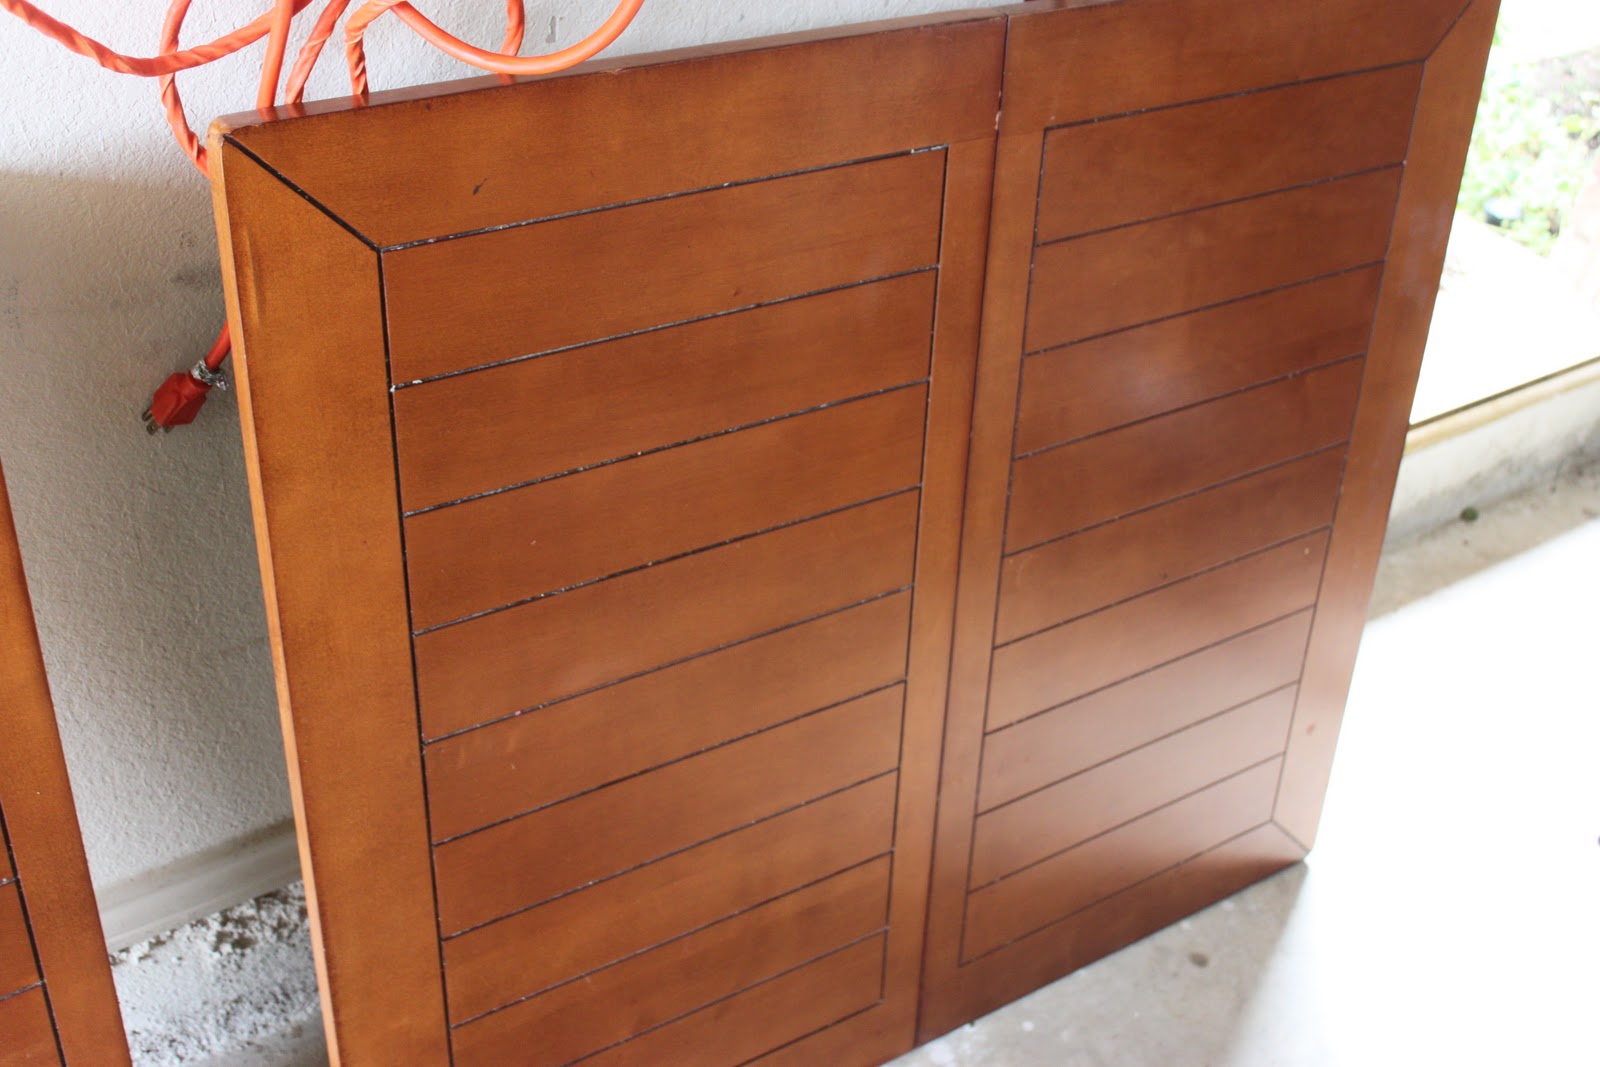
When Hubby and I put the house up for sale we had to do a lot of staging. We had to pack stuff up and re-arrange everything else. It was fun but at the same time exhausting. One table ended up being taken apart and stored in the garage. And another table was put in its place because it went better with the color scheme of the room. Well. This table did go better with the color scheme, dark brown with black legs. But it was a table with deep crevices. Several rectangles as part of the design.
 After a long time it just got gunked up with food and arts and crafts. There was no amount of scrubbing that could get all the gross junk out. You can almost see some of the gunk in the picture above.
Here's the table before:


It's the basic butcher block wood color with painted white legs with chairs to match. It had to go! But not to the curb.
So. I let my new obsession go to my head. Pinterest has a LOT of neat ideas and creative tutorials. So off I go to my local home improvement store to make the second table look a lot more pleasing to the eye and go with the color scheme.
I bought some liquid sander, stain and spray paint. Off to work I go. I started with the table first. Wiping on the liquid sander and shortly after, wiping off. At first I got the plain liquid stain. It doesn't give you much time to work with. I had some gel stain leftover from when we had our kitchen cabinets stained and that's a lot better to work with.
 It was actually a little bit fun! I sanded with a fine grit sand paper between two layers of stain. I used a flat enamel spray paint for the bottom part of the table and legs. I did put a thin coat of polyurethane on the top of the table just to keep it as nice as I can for a kitchen table.
I was a little bit nervous about doing the chairs. The best thing I could think to do was to spray paint the legs first. I just propped them on top of my garbage can and sprayed away. I worked my way up from there. Next I stained the seat.

 I took Hubby's bike down from the ceiling and hung the chairs upside down to avoid getting too much paint on the seat part. Thank God it was a very windy day when I did this!
This project maybe cost around $100. That's a lot better on the checkbook than a whole new furniture set. It's not perfect, but I'm very happy with it.
Here's the table before:


It's the basic butcher block wood color with painted white legs with chairs to match. It had to go! But not to the curb.
So. I let my new obsession go to my head. Pinterest has a LOT of neat ideas and creative tutorials. So off I go to my local home improvement store to make the second table look a lot more pleasing to the eye and go with the color scheme.
I bought some liquid sander, stain and spray paint. Off to work I go. I started with the table first. Wiping on the liquid sander and shortly after, wiping off. At first I got the plain liquid stain. It doesn't give you much time to work with. I had some gel stain leftover from when we had our kitchen cabinets stained and that's a lot better to work with.

I was a little bit nervous about doing the chairs. The best thing I could think to do was to spray paint the legs first. I just propped them on top of my garbage can and sprayed away. I worked my way up from there. Next I stained the seat.


This project maybe cost around $100. That's a lot better on the checkbook than a whole new furniture set. It's not perfect, but I'm very happy with it.
Subscribe to:
Posts (Atom)